Initializer (2) : It's All Because of Inheritance in Class
29 May 2019 |
Initializer
2nd - Class 의 초기화
1st post about Initializer in swift 에서는 초기화의 목적과 기본적인 내용에 대해 알아보았다.
이번 post 에서는 Class 로 만들 객체의 초기화에 대해 알아보려고 한다.
![]() Class 초기화의 모든 복잡성은 상속 으로부터 나오며, 초기화 과정도 상속으로 인한 처리가 추가되어있다고 보면 이해하기 쉽다.
Class 초기화의 모든 복잡성은 상속 으로부터 나오며, 초기화 과정도 상속으로 인한 처리가 추가되어있다고 보면 이해하기 쉽다.
 Table of Contents
- 목적
- Initializer
- custom
- default
- memberwise
- Initializer Delegation for Value types
-
Class Inheritance & Initializer
- Designated / Convenience
- Initializer Delegation for Class Types
- 2단계 초기화 (2 Phase Initialization)
- Initializer Inheritance & Overriding
- Automatic Initializer Inheritance (자동 상속되는 경우)
- Failable Initializer
- Required Initializer
- Closure or Function으로 default value 설정하기
4. Class Initializer
-
Class 가 Struct, Enum 과 다른 점 : 상속
-
상속받은 stored property에 대한 초기화가 추가된다.
Class 초기화 = 기존 초기화 + 상속받은 property 를 어떻게 초기화 할지에 대한 방법들
-
class initializer - 2가지 type
- Designated
- Convenience
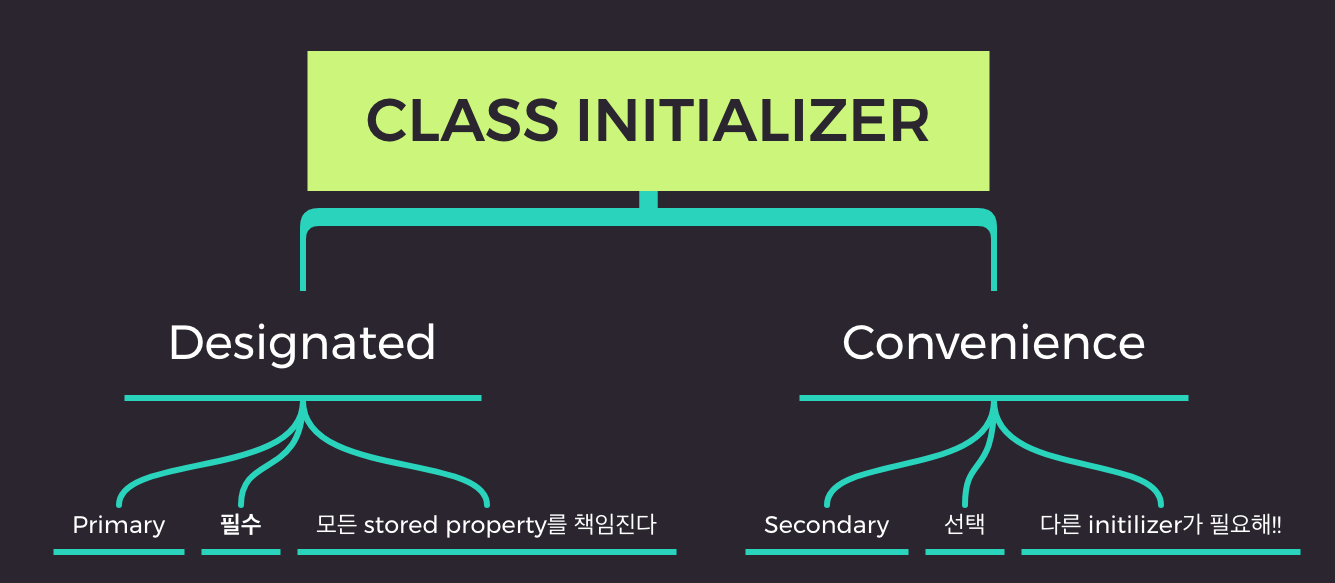
Designated Initializer
🔑 해당 class 의 instance 초기화를 온전히 담당하는 initializer
- 해당 class의 모든 stored property를 초기화
- primary init - 필수
- super class의 적절한 init을 call - superclass에서 상속받은 속성도 초기화 할 수 있도록
- funnel point : 상속을 통한 class의 계층구조에서 해당 class 초기화의 기준점이 된다.
- 모든 class는 designated init을 최소 1개는 갖고 있어야 한다
- 수가 적다. 주로 1개
Convenience Initializer
-
해당 class의 다른 init을 호출하여 초기화를 이어나감
- 다른 convenience init 혹은 designated init
-
secondary init - 필수는 아니다
Convenience initializers are secondary, supporting initializers for a class. You can define a convenience initializer to call a designated initializer from the same class as the convenience initializer with some of the designated initializer’s parameters set to default values. You can also define a convenience initializer to create an instance of that class for a specific use case or input value type.
-
conveniencekeyword : init 앞에 명시해줌 -
주로 designated init의 parmeter 중 몇 개에 default value를 지정해서 designated init을 call 하는 방식
ex. designated init 에 age default value로 1을 던짐
struct Person { let name: String let age: Int init(name: String, age: Int) { self.name = name self.age = age } convenience init(name: String) { self.init(name: name, age: 1) } } -
목적 : 초기화하는 좀 더 단순한 방법을 제공하고, 의도를 명확하게 하기 위함
 Initializer Delegation for Class Types
Delegation 은 초기화를 온전히 다 담당하지 않고, 일부를 다른 initializer에게 맡기는 것이다. Class의 경우, 상속관계와 convenience init로 인해 비교적 복잡하다. 그래서 class initializer delegation에는 3개 규칙이 있다.
단순화를 위한 3가지 Rule (→는 호출을 의미)
-
해당 class designated init → immediate subclass designated init
designated init은 상속관계에서 바로 위의 superclass의 designated 호출해야 한다.
-
convenience init → another init in the same class
같은 클래스 내의 다른 init을 호출해야 한다.
-
convenience init ⇢→ designated init
convenience 는 궁극적으로 designated를 호출해야 함. 화살표를 따라가면 끝은 designated 라는 뜻!

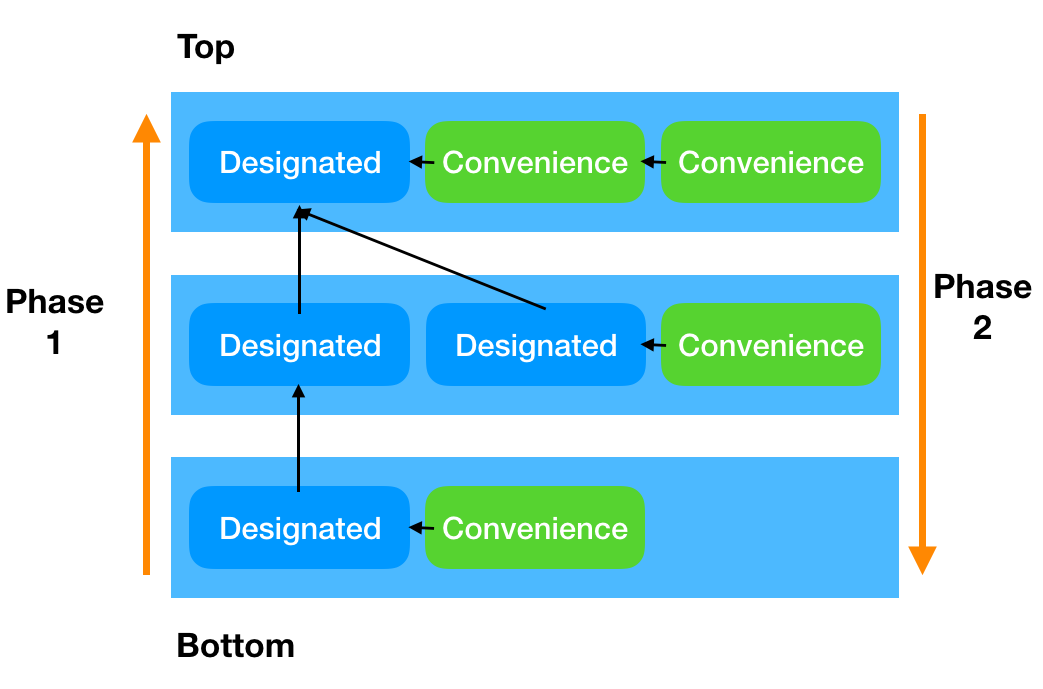
2 단계 초기화
class 계층구조에서 초기화는 두 단계로 이루어진다.
stored property가 선언된 class에서

계층구조에서 각 class 에서
총 2번 일어난다.
2단계 초기화가 필요한 이유는 다음과 같다.
해당 property가 선언된 곳에서 초기화가 끝나야 다른 곳에서 그 property에 접근할 수 있다.
상속 관계에서, subclass 에서 상속받은 superclass 에서 선언된 property의 값을 custom 해서 수정하고 싶다면 일단 superclass init을 거치고 와야 가능하다는 뜻이다. subclass에서 superclass로부터 상속받은 property의 값을 custom 하여 초기화 하고 싶은데, 이 property 에 접근하려면 일단 superclass designated init을 불러서 생성 된 후에 설정할 수 있다.
- 목적
- 안전한 초기화를 위해서 : 기대하지 않은 이상한 값이 초기값으로 들어가지 않도록 함
- instance 생성이 완료되면 그 instance로 초기화 하고 싶어서 (instance method 등)
- swift compiler는 안전한 초기화를 위해 다음 네가지의 사항을 체크한다
- designated init은 자기 class에서 선언된 모든 stored property를 초기화 한 뒤에, superclass designated init으로 나머지 초기화를 맡길 수 있다
- designated init에서 상속받은 property를 초기화 하려면, superclass init 을 부른 뒤에 가능하다.
- convenience init은 다른 init에게 초기화를 다 맡기고 그게 완료되면, property에 값을 설정할 수 있다. 미리 설정하고 다른 init을 부르면 이미 설정해 놓은 값이 다른 값으로 overwritten 될 수 있다.
- 1단계가 완료되어야 initializer가 할 수 있는 것
- instance method 호출해서 사용하기
- instance property 사용
- self 사용
1단계 - instance 생성
- 완료시, 메모리에 모든 instance 가 생성된다.
- 각 class의 designated init이 완료됨 == 해당 class에서 선언된 stored property의 초기화가 완료됨
- superclass init을 불러서 각 level에서의 초기화가 완료되도록 한다
- 상속 계층구조에서 가장 상위의 class의 init 이 완료되면 1단계 완료
2단계 - property customizing
- 1단계에서 instance 생성이 완료 되었으므로 instance method, property, self를 value로 사용하기 를 사용할 수 있다.
- 가장 상위 class 부터 내려오면서, customizing 하는 과정
무조건 해당 class 레벨에서 할 일을 먼저 하고, 상위 클래스 초기화 하고, 그 뒤에 customizing
Designated init {
	phase 1) 자기 class 내에서 선언된 property 초기화 하기
	phase 1) super class designated init 호출
	phase 2) 상속 받은 property customizing, instance method, property 사용 등
}
Convenience init {
	phase 1) 다른 init 호출
	phase 2) property customizing
}
Initializer Inheritance & Overriding
Initializer 는 상속되지 않는다
- 기본적으로 initializer는 상속되지 않는다
- 특정 조건하에서는 자동 상속 - 안전, 적절하다고 판단되는 경우
- 이유
- superclass의 좀 더 단순한 init 이 더 구체적인 개념의 subclass를 초기화 하기엔 한계가 있다.
- 완전하게 초기화 되지 않는 상황을 방지하기 위함
Overriding - superclass designated init이랑 똑같은 걸 subclass에서도 쓰고 싶을 때
-
override : subclass에서 superclass의 method(init 포함)을 자신만의 기능으로 재정의 하는 개념 - 이름, parameter type, 순서, 개수 다 같아야 함
-
superclass 의 designated init과 똑같은 init을 쓰고 싶다면 overriding 하면 된다
-
subclass에서는 그게 designated / convenience 둘 다 될 수 있음
-
방법 :
overridemodifier를 init 선언 앞에 추가하면 됨 -
superclass의 자동 생성된 default init을 재정의 하고 싶을 때도 마찬가지로 명시해야 됨
- default init 이 자동 생성 되어있음 == custom init 이 없음 == default init이 designated init임
-
superclass의 convenience init은 해당 클래스 내에서만 호출되므로 하위 클래스에서 호출 될 일이 없음. 그러므로 convenience init이랑 같은 init을 하위에서 쓴다고 해서 override를 붙일 필요 없음
-
example : default init overriding
class Vehicle { var numberOfWheels = 0 var description: String { return "\(numberOfWheels) wheel(s)" } } class Bicycle: Vehicle { override init() { super.init() // phase 1 numberOfWheels = 2 // phase 2 - customizing } } let vehicle = Vehicle() print(vehicle.description) // 0 wheel(s) let bicycle = Bicycle() print(bicycle.description) // 2 wheels(s)-
super.init()생략 가능한 경우 : phase 2 customizing 없고, argument가 없는 init
-
-
superclass init 이 암묵적으로 호출되는 경우 : subclass designated init에서 상속받은 property에 대한 customizing 안하는 경우
- == 자기 class 내에서 선언된 property 만 초기화 하는 경우
- phase 2에서의 customizing을 할 필요 없다면, 명시적 호출은 불필요
- subclass init 뒤에 자동으로 superclass init이 호출된다
- example
class Hoverboard: Vehicle {
  var color: String
  init(color: String) {
    self.color = color
  }

  override var description: String {
    return "\(super.description) in a beautiful \(color)"
  }
}

let hoverboard = Hoverboard(color: "gold")
print(hoverboard.description)
// 0 wheel(s) in a beautiful gold
Automatic Initializer Inheritance - 자동 initializer 상속
특정 조건 하에서만, superclass init을 subclass 가 상속받을 수 있다.
상속받기 위한 rule
- subclass가 designated init을 선언하지 않으면, superclass designated init 상속 받는다
- subclass 가 superclass designated init을 모두 구현했다면, superclass convenience init 도 모두 상속 받는다
- 구현은 rule 1 혹은 재정의한 경우를 의미한다.
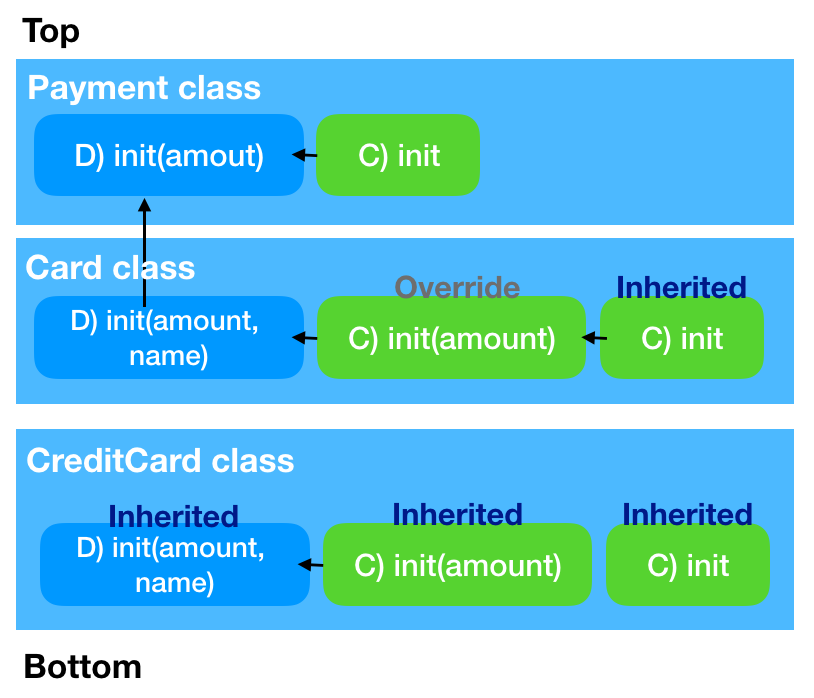
Example
Hierarchy : Payment - Card - Credit card
class Payment {
  let amout: Int
	init(amount: Int){
    self.amount = amount
  }
  convenience init() {
    amount = 1000
  }
  var description: String {
    return "You need to pay \(amount)"
  }
}

let donation = Payment()
let phoneBill = Payment(amount: 40000)
print(donation.description)
// You need to pay 100
print(phoneBill.description)
// You need to pay 100
class Card: Payment {
  var name: String
	init(name: String, amount: Int) {
    self.name = name
    super.init(amount: amount)
  }
  override convenience init(amount: Int) {
    init(name: "none", amount: amount)
  }
  override var descripton: String {
    return "You need to pay \(amount) with \(name) card"
  }
}

let myCard = Card(name: "Kookmin",amount: 1000)
let momsCard = Card(amount: 1000)
let yourCard = Card()
//셋 다 가능
- Card class는 superclass Payment의 모든 designated init을 구현했기 때문에, Payment의 모든 convenience init 을 자동 상속 받는다 (rule 2)
class CreditCard: Card {
  var limit: Int = 5000000
  override var description: String {
    return "You need to pay \(amount) with \(name) credit card"
  }
}
- CreditCard class는 designated init을 정의하지 않음 → superclass designated init을 자동 상속받음 (rule 1)
- rule 1에 의해 superclass의 designated init 모두 구현함 → superclass convenience init도 모두 상속받음 (rule 2)
Summary / Thoughts
- class 는 상속으로 인해 initializer 구성이 복잡하다
- Designated, convenience init 로 구분하는 이유는 상속 관계에서 상하위 클래스의 초기화를 이어주는 중심점인지 여부를 가리기 위해서이다.
- 2단계 초기화는 상속 관계에서 각 class에서 선언된 property를 초기화하고, 이를 customizing 하는 과정이다
- struct 가 memberwise initializer를 자동으로 제공하는데는 swift의 안전 우선 특성이 반영되어있다.
- initializer는 다른 initializer를 호출하여 초기화 과정을 서로 품앗이 할 수 있다
- initializer는 기본적으로 상속될 수 없지만, 특정 조건 하에서는 상속된다.
- class init은 복잡한만큼 중요하다. Swift 의 안전을 강조하는 특성이 잘 드러나 있다고 생각한다.
Reference